Technical SEO Health is important to your overall website's organic performance just as much as keywords, link building, content ideation, etc may be.
Busy marketer with only 90 minutes to get a general sense of whether your site is healthy or not? Did your boss just ask you how healthy you think the site is? Trying to make a business case to your boss for some additional SEO budget for the next year? Did business development ping you and ask, "Hey, what do you think about this site?"
If it’s something you’ve been wanting to tap into, but aren’t sure where to start or have limited time to focus on this, this post is for you!
What does “Technical Health” Mean?
The technical health of your site refers to:
- Can your site be crawled?
- How quickly and easily?
Did you make it easy for search engines to find and share valuable content for searchers?
Advanced Technical SEO Terms
In this article, we’ll refer to many Technical SEO elements! If these items are new for you, please review the glossary of terms at the bottom of this article.
Tip 1: Check for Duplicate Content
Estimated Time: 15 minutes
These common SEO issues can cause big problems and can run through a spot-checked pretty quickly.
What is Duplicate Content?
Duplicate content refers to any identical or near-identical indexable content on the web.
Why is Duplicate Content an Issue?
Search engines do not know which version of the page to include in the index. This can often dilute backlink authority as it is no longer clear where the link metrics like authority and link value should be given to and search engines don't know which version(s) to rank for query results.
By checking the following elements, you can check for simple duplication across your site (vs complex duplication). These technical elements aim to address the fundamental/basic technical issues on your site.
- Trailing vs Non-Trailing Slashes
- HTTP vs HTTPS
- Mixed Case URLs
- UTM Parameters
The process is similar for all of these types of duplicate content but we’ll use the Trailing vs Non-Trailing Slash element as an example.
1.1 Check Trailing vs Non-Trailing Slashes:
Step 1: Navigate to a page on your site
Example:
Step 2:
- If the page currently has a trailing / - remove it!
- Does it 301 redirect?
- Does it canonicalize?
- Does it 404?
- If the page does not currently have a trailing / - add it!
- Does it 301 redirect?
- Does it canonicalize?
- Does it 404?
Step 3: Repeat this process on a few different templates and areas of your site.
Example:
- A Service Page:
- https://www.seerinteractive.com/work/seo/
- https://www.seerinteractive.com/work/seo
- A Form:
- https://www.seerinteractive.com/contact/
- Type in: https://www.seerinteractive.com/contact
- About:
- https://www.seerinteractive.com/people/
- Type in: https://www.seerinteractive.com/people
How Do I Know If This Is an Issue?:
If both versions of each page resolve and are not canonicalized or 301 redirected properly this is an issue and is considered duplicate content.
What is the Solution?
Pick a main canonical URL version of the URLs on your site, each URL on the site should either enforce a trailing slash or a non-trailing slash. Only one of these is official. Any other ones are just cheap bootlegs of a Taylor Swift concert recording on someone's shaky phone. This makes it clear for search engines to find the main canonical URL of your site.
- Best: A 301 redirect from either trailing / to non-trailing / or vice versa
- Good: A Canonical tag from either trailing / to non-trailing / or vice versa. This will waste Crawl Budget as Google has to crawl both versions of the page.
- Bad: Neither happens and both versions of the page are indexable creating duplicate content issues. Now you are selling both the official, canonical Taylor Swift concert AND the cheap bootleg. No Bueno.
Server-Specific Solutions:
Below are the Apache, NGINX, and IIS official documentation on how to execute this:
- Using Apache's httpd.conf File
- http://httpd.apache.org/docs/2.0/misc/rewriteguide.html
- Using Apache's .htaccess File
- http://httpd.apache.org/docs/2.0/misc/rewriteguide.html
- Using NGINX 21
- https://www.nginx.com/blog/creating-nginx-rewrite-rules/ and https://www.ateamsystems.com/tech-blog/nginx-add-trailing-slash-with-301-redirect-without-if-statements/
- NGINX details how to convert Apache HTTP server rewrite rules into NGINX rewrite rules.
- Using IIS 7.x and above
Repeat this process for the following issues:
1.2 HTTP vs HTTPS
Example:
-
- A Service Page:
-
-
- https://www.seerinteractive.com/work/cro/
- https://www.seerinteractive.com/work/cro
- A Form:
- https://www.seerinteractive.com/contact/
- Type in: https://www.seerinteractive.com/contact
- About:
- https://www.seerinteractive.com/people/
- Type in: https://www.seerinteractive.com/people
-
How Do I Know If This Is an Issue?:
If both http and https resolve, this is an issue.
What is the Solution:
Best: a 301 redirect from the HTTP version to the HTTPs version, many times this is done via a 307 redirect as well.
Server-Specific Solutions:
Below are the Apache, NGINX, and IIS official documentation on how to execute this:
- Using Apache's Virtual Hosts File
- https://cwiki.apache.org/confluence/display/httpd/RedirectSSL
- Using Apache's .htaccess File
- https://cwiki.apache.org/confluence/display/httpd/RedirectSSL
- Using NGINX
- https://www.nginx.com/blog/creating-nginx-rewrite-rules/
- NGINX details how to convert Apache HTTP server rewrite rules into NGINX rewrite rules https://www.nginx.com/blog/converting-apache-to-nginx-rewrite-rules/
- Using IIS 7.x and above
1.3 Mixed Case URLs
Example:
- A Service Page:
- https://www.seerinteractive.com/work/paid-media
- Type in: https://www.seerinteractive.com/work/Paid-Media
How Do I Know If This is an Issue
- If both uppercase and lowercase versions of the URLs resolve and are indexable, this is an issue.
What is the Solution?
- Best: A sitewide 301 redirect forcing any uppercase version of the URL to the lowercase.
- Good: a Canonical tag from the uppercase version of the URL to the lowercase. This wastes crawl budget as Google has to crawl both versions of the page.
- Bad: Neither happen and both versions of the page are indexable creating duplicate content issues.
Server Specific Solutions:
Below are the Apache, NGINX, and IIS official documentation on how to execute this:
- Using Apache's httpd.conf File
- http://brianflove.com/2014/08/11/lowercase-your-uris/
- Using Apache's .htaccess File
- https://www.linode.com/docs/guides/how-to-set-up-htaccess-on-apache/
- Using NGINX
- For more details on the specific PERL scripts required please visit: https://dodwell.us/rewrite-uri-to-lowercase-using-nginxperl-nginxlua-or-apache.html
- It’s also possible to use LUA scripting.
- Using IIS 7.x and above
- IIS URL Rewrite has a utility to import Apache mod_rewrite rules if moving from an Apache to IIS web server. While this requires edits and testing, it does make the migration process slightly faster and easier than recreating the rules from scratch.
1.4 UTM Parameters
Example:
- https://www.seerinteractive.com/work/analytics
- Add a UTM Parameter: https://www.seerinteractive.com/work/analytics?utm_source=seertest&utm_medium=test&utm_campaign=test
How Do I Know if this is an Issue?
- If the UTM parameter does not contain a canonical tag to the main version of the page this is a problem.
What is the Solution?
- Best: Find and fix those links. The first rule of Analytics Fight Club is that you do not tag internal links with UTM parameters. You could link to the Screaming Frog guide about how to find links containing UTM in the URL.
- Good: Canonical tag + GSC parameter handling. Yes, GSC parameter handling might be deprecated soonish (please verify), but you can specify UTM parameters as... tracking parameters.
Tip 2: Check GA for 404 Errors with Sessions
Estimated Time: 10 minutes
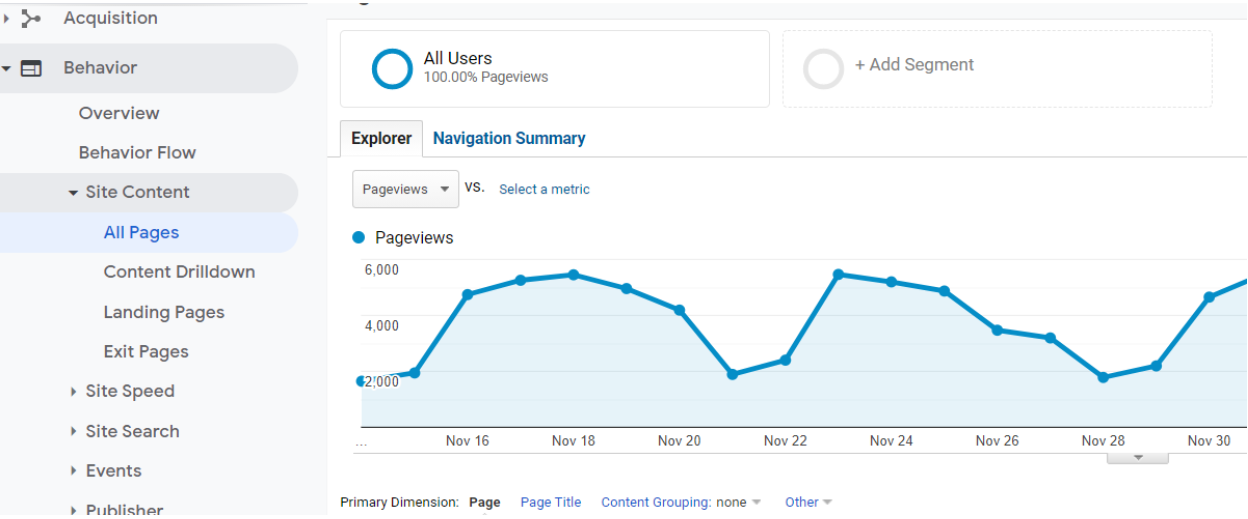
This pro tip is from our own Tech SEO Expert Allison Hanh and is a personal favorite for me! View real-time pageviews to your 404 pages with the help of Google Analytics.
Step 1: Trigger a 404 Error on your Site
Type in a random string of numbers and letters to trigger a 404 error on your site.
Example: https://www.seerinteractive.com/23ou4234uo23
Step 2: Copy the Title Tag of the 404 Page
In our case, it’s “Page not found | Seer Interactive”.
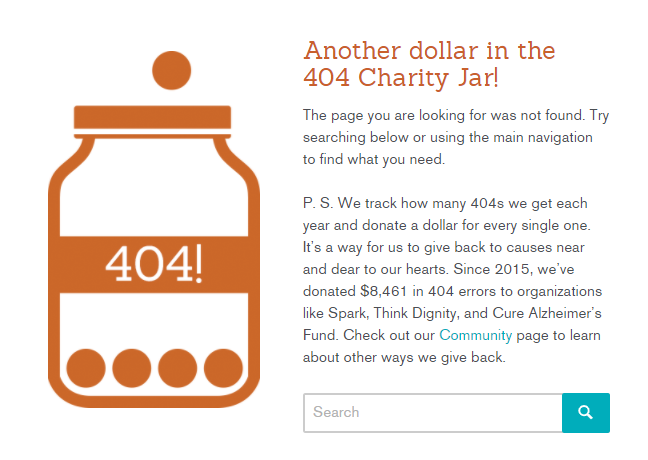
Find the title tag by typing in CTRL + F and search for “</title>”.
Step 3: Navigate to Google Analytics Site Content Report
Go to Behavior > Site Content > All pages
Step 4: Add a Segment for Organic Traffic
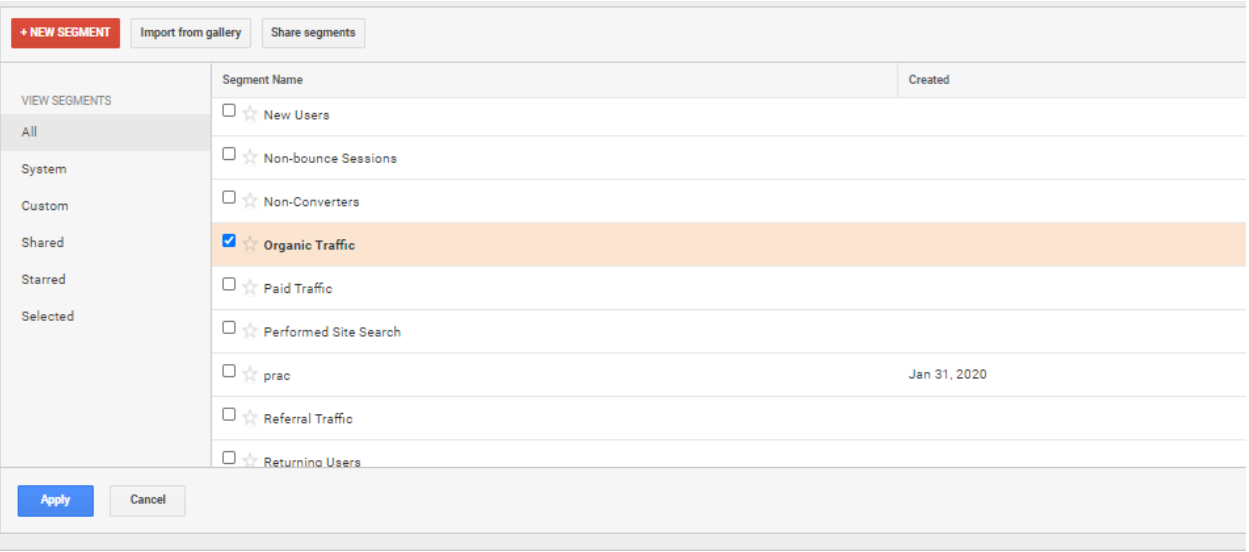
Step 5: Change the Date Range
Consider choosing the past 90 days as anything longer could be a page that was re-added or redirected.
Step 6: Add a secondary dimension for “Page Title”
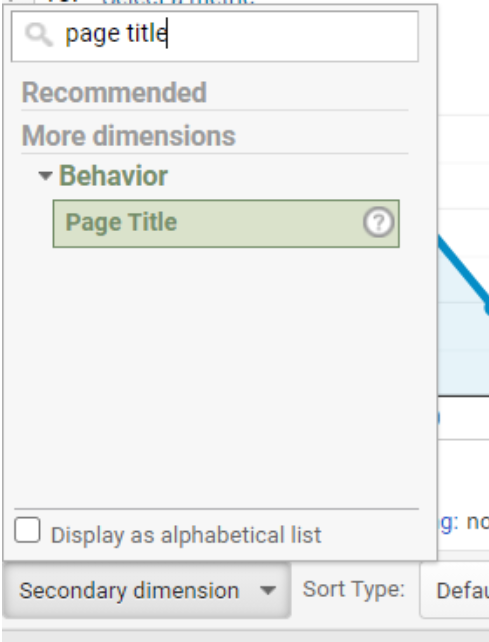
Step 7: Add an Advanced Filter for Page Title
Set the advanced filter to Include > Page Title > Containing and then type in the <title> element on the 404 pages and click apply.

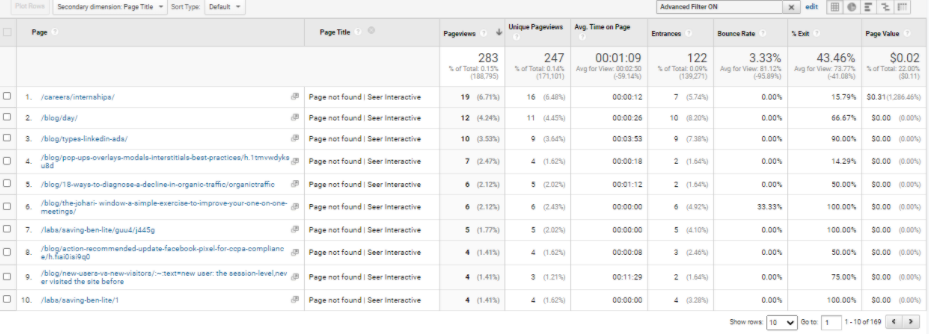
Here you will be able to see 404 pages and their actual pageviews! 301 Redirect the pages with a significant amount of pageviews. Below you can see that 404 errors in the past X days have had over 864 pages. Export this list, map the 404ing pages to a new source, and hand it off to your developer to implement 301 redirects!
Tip 3: Set Up Change Tracking Alerts
Estimated Time: 10 minutes (daily after set-up time)
This tip is so good, it almost feels like cheating! Is your site already in tip-top technical shape? That can change at any moment! We often see freak accidents on our clients' sites like homepages being noindexed, canonical tags changing site-wide to the staging version of a site, hreflang tags being removed, noindex tags being added to critical pages on the site, high-value pages being removed - you name it!
Take the manual work out of checking your site for technical issues that affect search engine performance with an automated SEO Page Change Tracking tool! These are often relatively low cost, especially for a single site.
Setting up SEO Page Change Tracking Once you set up the automation, you can passively receive alerts for your site without having to seek them out! After the initial set-up time, reviewing these alerts usually takes around 10-15 minutes!
At Seer we are partial to Content King but there are several options out there.
Some examples of items this tools can check:
- Indexation of all pages on the site and/or priority pages
- Changes in the robots.txt file
- SSL certificate expiration
- Canonicalization changes
- Meta Tag changes
- Title tag, H1, Meta Description, Copy changes
- Hreflang tag changes
...and more!
Tip 4: Audit Your XML Sitemap File
Estimated Time: 20 mins
Good technical health starts at the top!
Check if your XML Sitemap file needs to be updated! The XML sitemap is one of the first things a search engine looks at on your site, this should act as a clear map or legend and should be free of errors. Only indexable pages with an HTTP status code of 200 should exist within your XML sitemap. This next step requires a Screaming Frog license but I have included a free workaround at the bottom if needed.
Step 1: Open Screaming Frog
For more information, read our comprehensive Screaming Frog Guide.
Crawl Your XML Sitemap with Screaming Frog
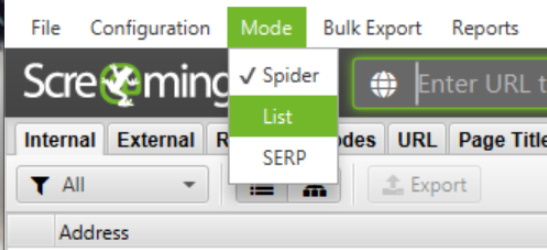
Step 2: Download your XML sitemap file into Screaming Frog by going to: Mode > List
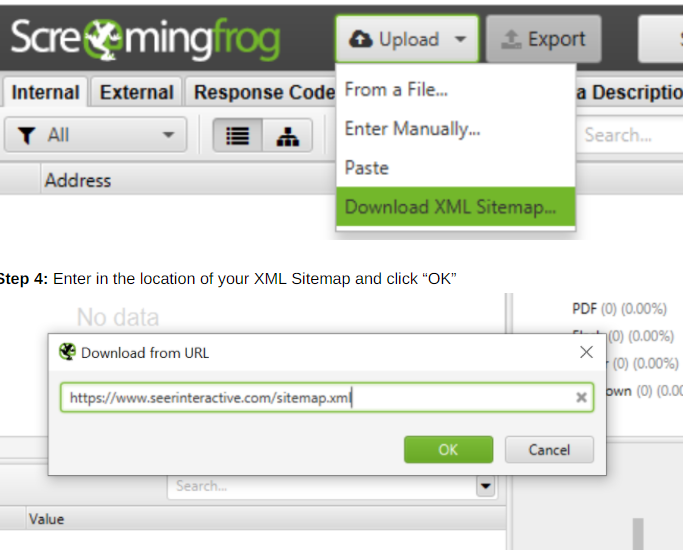
Step 3: Next click Upload > Download XML Sitemap
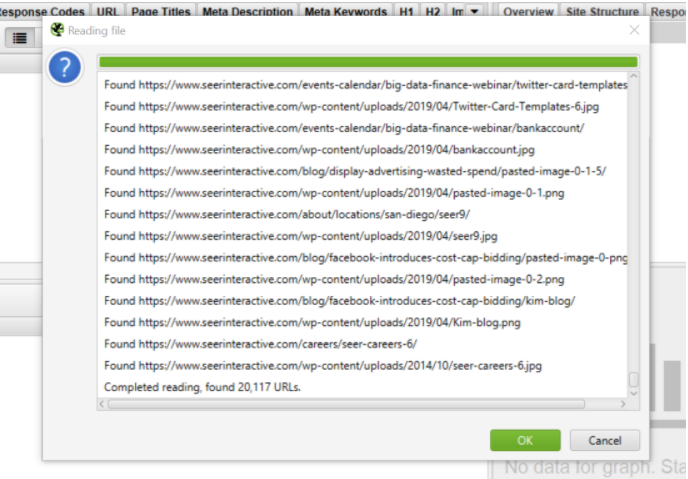
Your sitemap should begin downloading, once it’s done click “OK”, The tool will then begin crawling your XML Sitemap File.
Step 5: Once the crawl is complete, export “internal all”
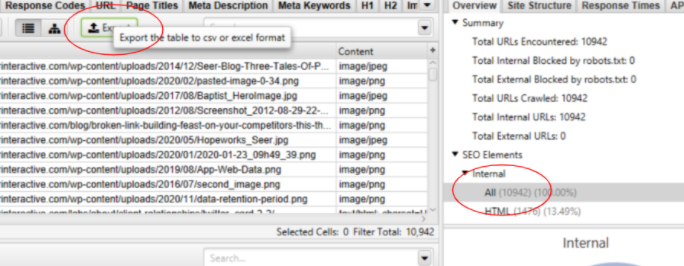
Step 6: Open your CSV and Filter your CSV for any non indexable URLs
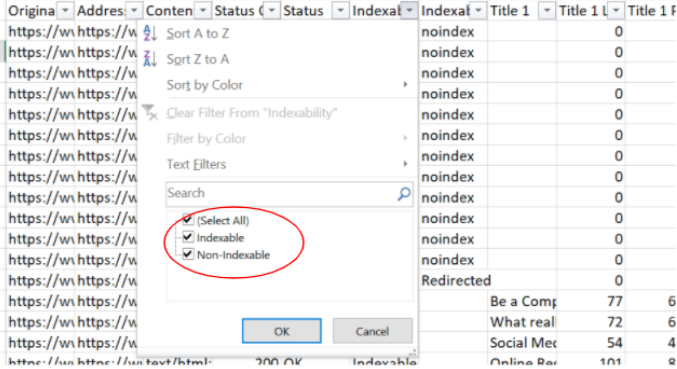
How to Fix This:
- Your XML Sitemap should be free of
- Any page that does not have a HTTP status code of 200
- Any page marked “Non-Indexable” in the “Indexability” Column
Step 7: Check that your XML Sitemap File is Declared in Your Robots.txt File
When search engines first get to your site they first look for the robots.txt file! Make sure that your XML sitemap is neatly declared here so that a search engine can then move on to crawling this file.
Example: https://www.seerinteractive.com/robots.txt
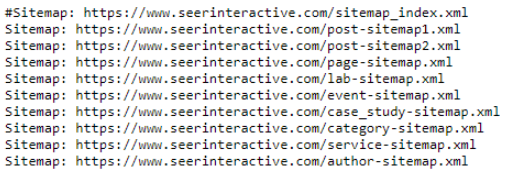
Above you can see all of the XML sitemaps on the Seer site declared using “Sitemap:”.
If You Do Not Have a Screaming Frog License:
If you do not have a screaming frog license instead use a free tool like https://httpstatus.io/, grab the URLs from your XML sitemap file, and paste them into the tool! Remove an XML sitemap

Tip 6: Use Google’s Mobile Friendly Testing Tool
Estimated Time: 5 mins
Mobile-first indexing has been the talk of the town ever since it was announced in March 2018. Your site should be optimized for mobile by this point as most searches happen on a mobile device.
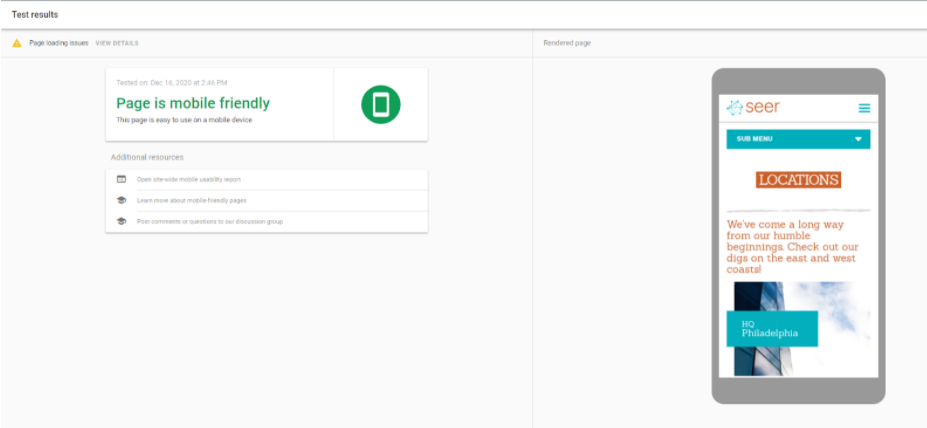
Use Google’s own Mobile Friendly Testing Tool to quickly figure out whether or not your site is mobile friendly!
Example:

Here you can see a live rendering of how Google views your page on mobile! Is your video type supported? Are the stylistic elements showing? Does your page look significantly different from how a user would see it?
Find yourself wanting to go a bit further? Below is an extra bonus tip that might take you a little longer to address but you will find (hopefully) exponential value in!
BONUS TIP: Spot Check Errors Using Google Search Console
Estimated Time: 60 minutes.
The best way to know how Google is crawling and understanding your site? Straight from the horse's mouth. Our favorite easily digestible report to find technical issues is the “Coverage” report which can give you directional advice about where the most serious and most frequent technical issues are occurring on your site!
To find this go to Index > Coverage
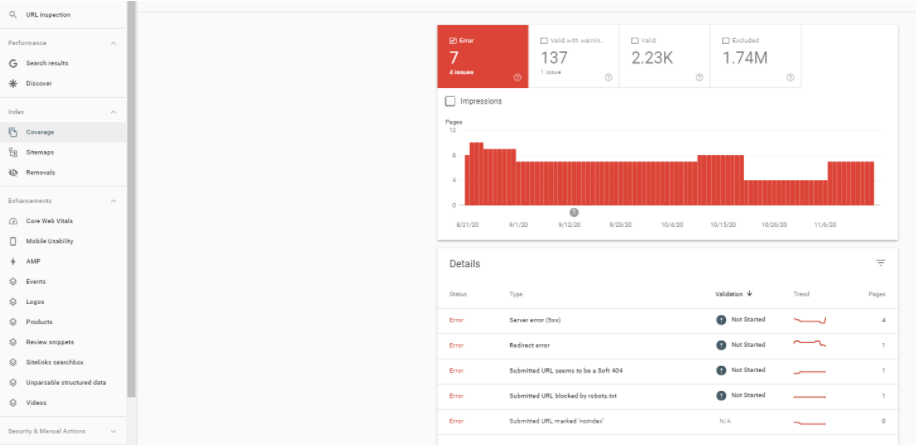
Here you can find a variety of different issues including server errors, redirect errors etc. Although diving into each of these issues will take more than 20 minutes, 20 minutes can help give you a more directional sense of the issues Google is experiencing on your site.
Start auditing this list within each section, starting with the errors report and making note of trend lines and the # of pages affected.
- Auditing “Errors”
- What They Are:
- These errors are neatly laid out and give you a good idea of where Google is running into issues while crawling your site
- How to Evaluate Them:
- If the trend line has shot upward, this may be the sign of a more recent problem.
- What They Are:
- Auditing “Valid with Warnings”
- What They Are:
- These pages have been indexed, but there are warnings on them.
- How to Evaluate Them:
- Take a look at the specific issue and start with the issue with the most # of pages.
- What They Are:
- Auditing “Valid”
- What They Are:
- These pages have been indexed without any known issues
- How to Evaluate Them:
- Take a look at the pages being indexed, are there pages in there that aren’t meant to be indexed? Parameterized pages? Internal only pages?
- What They Are:
- Auditing “Excluded”
- What They Are:
- These pages have not been indexed
- How to Evaluate Them:
- Take a look at these pages, why haven’t they been indexed? Was this intentional?
- What They Are:
There are exponentially more areas to explore within the world of Technical SEO! But we hope these give you a good idea on where to get started.
Glossary of Technical SEO Terms
In this article, we’ll refer to the following Technical SEO elements! If these items are new for you, please review the glossary of terms below.
- XML Sitemap
- What it is: An XML Sitemap is literally a map of your site. Whether you get lost in the mall or Italy, you're going to want a map to figure out where everything is. Search engines are just the same.
- How to Build One:
- Robots.txt File
- What it is: A robots.txt file designates pages that search engines should either include or exclude from crawling. The robots.txt file should also declare the location of your XML sitemap. Think of your robots.txt file like a crazy wizard on a narrow bridge - the wizard is deciding who shall and who shall not pass and where they can or can’t go! The wizard also gives out [XML Site]maps on the bridge to all who dare to pass.
- How to Build One:
- Crawl Budget
- What it is: The amount of time Google spends crawling and indexing your pages. It’s highly unlikely that Google will crawl and index all of the content on your website. Google creates a list of most important to least important pages and crawls the list from top to bottom. Some factors that influence URL priority: Site/Page Authority (# of quality backlinks and quality of content), XML Sitemap, Internal Links.
Found an issue while running through this list? Not sure how to address it? Bit of more than you can chew? The Technical SEO Team at Seer is here to help! Click here to Contact Us.
