To skip sections or jump around between them - you can use the links below:
- Types of Pixel Implementations
- Getting Started with the Facebook Pixel
- Facebook Pixel Events
- Facebook Pixel Conversions
- How to QA Your Facebook Pixel Setup
Types of Pixel Implementations
Implementation Method #1
Requires you to trigger events based on information available on each specific page of your website. The first implementation method does not require you to do that unless you are hardcoding events onto every page of your website manually.
Implementation Method #2
The second method of implementation can track events automatically without code.
The Facebook Pixel can find and report on valuable website events, such as purchases or registrations, based on your site traffic, button text and page metadata. This feature can help you set up events without having to install code. You can choose to turn this functionality on or off.
Getting Started with the Facebook Pixel
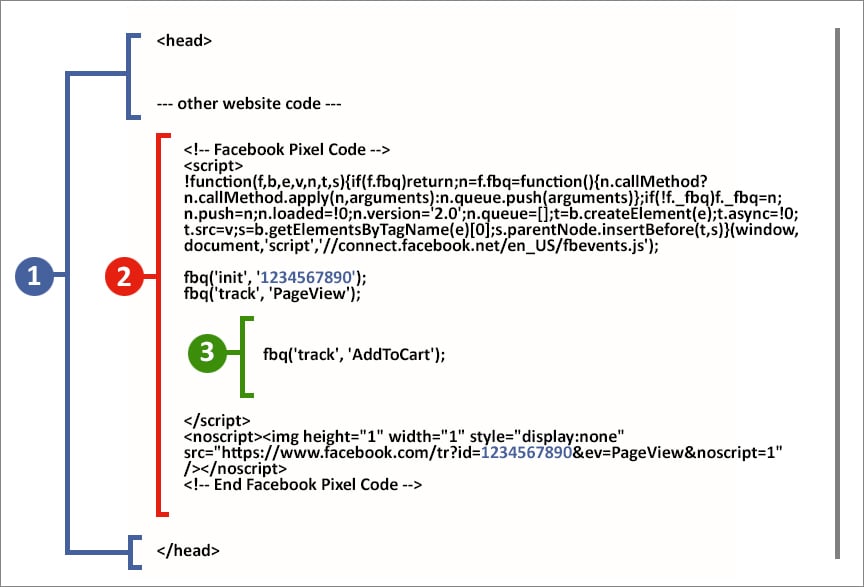
The Facebook Pixel is made up of:
- Your Facebook Pixel
- The base code
- The standard event code(s)
Facebook Pixel Deployment Options
Your options include 1) deploying the Facebook Pixel code via the Partner Integrations, or 2) manually placing the code.
One method is scalable, easy for anyone to update, and doesn’t require development work. The other method is less scalable and often prone to errors ... plus it requires development work. I’ll give you a few guesses as to which one is which.
Option #1: Partner Integrations
- Tag Managers (e.g. Google Tag Manager, Tealium, etc.)
- Web Hosting Systems (e.g. Shopify, Magento, Woocommerce, etc.)
With this Facebook Pixel implementation method, you can create specific conversions based on standard or custom events that you set up using the Facebook Pixel Event Setup Tool (more on that later!)
Option #2: Manual Code Placement
This means your developer places the code into your website source files.
Paste the Facebook pixel code between the <head> and </head> tags of your web page. You may already have other existing code between the head tags, so just place the pixel code underneath that, but above </head>.
- Not scalable
- Requires web development - access, knowledge, and resources
Setting up a New Facebook Pixel
Create a new one:
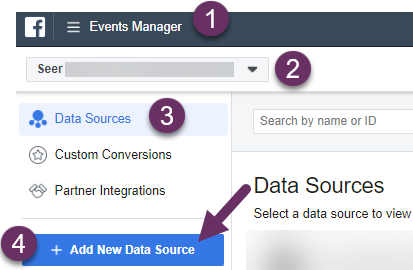
- Start by going to your Facebook Events Manager (business.facebook.com/events_manager)
- Select the appropriate Facebook page in the top left-hand corner dropdown
- Make sure you are in the Data Sources tab, and then click Add New Data Source
- Select Facebook Pixel.
- Choose out of the 3 deployment options. Remember our cautions above, and make sure you choose wisely.
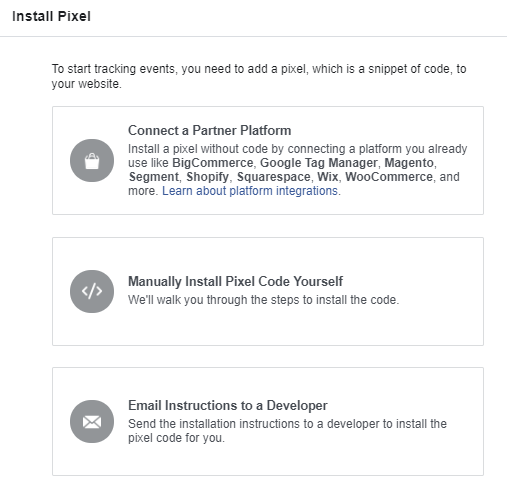
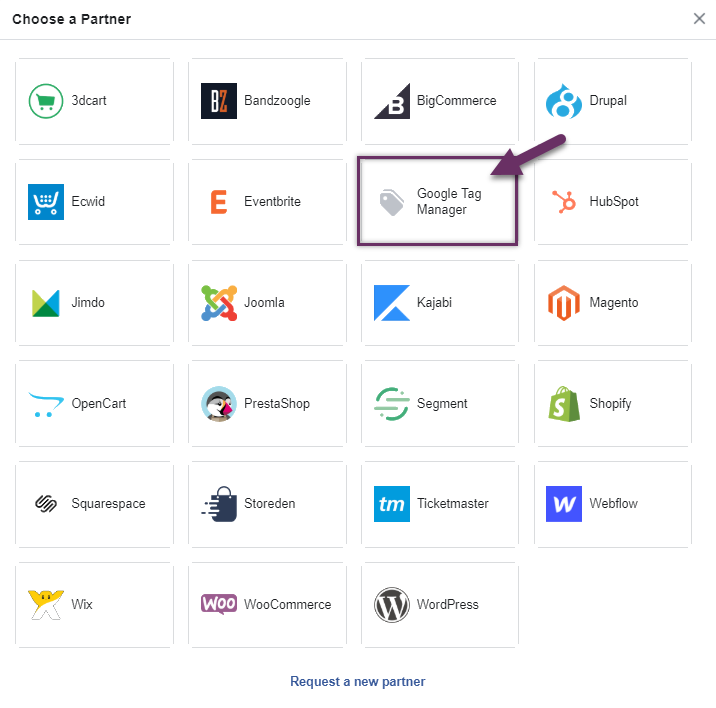
- We recommend choosing Google Tag Manager if you have a GTM container already installed on your website. Otherwise, you can choose from a list of supporting integrations:
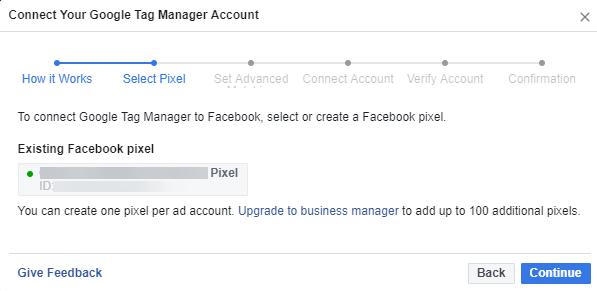
- You’ll get the gist of what the Google Tag Manager integration entails in the next screen which includes information about Automatic Event tagging. Click Continue when you are sure this is the best method for you.
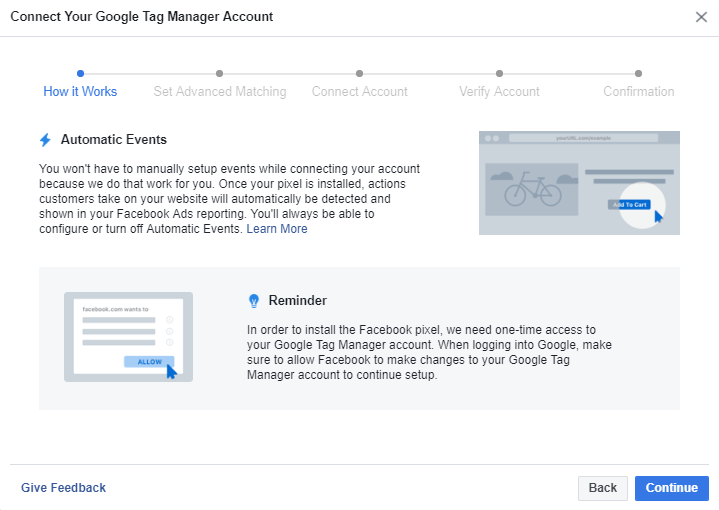
- The next few screens will ask you to connect a GTM account by signing into it with Google. This means you are allowing Facebook to publish the Facebook Pixel automatically for you upon confirmation of the account integration.
- In your Google Tag Manager container, check to make sure Facebook published with the right account ID and information.
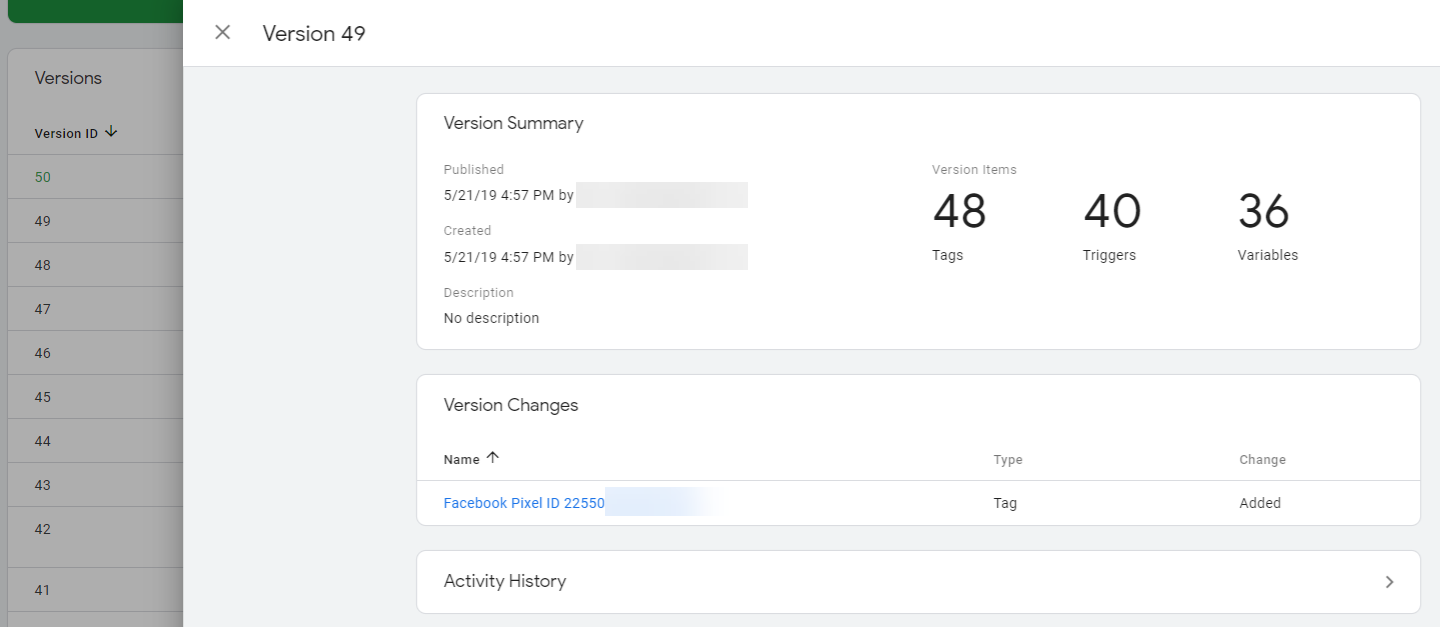
- Note: You will have to look at Published Version History. This is because once you’ve enabled the integration, the container is automatically published on your behalf in the Default Workspace. If you have another workspace already that is added to GTM unpublished, Facebook creates a new workspace and publishes that one instead. That way there’s no tracking interferences.
Upgrading an Existing Facebook Pixel
- If you start fresh: Follow the above instructions - create a new ad account and Pixel ID from scratch. Enable the partner integration needed and set up the Pixel with best practices. Once you test and debug your new implementation, you'll need to ask your developer to entirely remove the old, outdated code from all pages of your website.
- If you upgrade your existing Pixel: Add a new Partner Integration to your current pixel implementation like so:
Facebook Pixel Events
Standard Event Codes
Events are actions that happen on your website. Standard events are predefined by Facebook and can be used to log conversions, optimize your advertising for conversions and build new audiences.
See below for a list of standard events:
| WEBSITE ACTION | DESCRIPTION | STANDARD EVENT CODE |
| Add payment info | The addition of payment information in the checkout flow (ex: click, landing page on billing info) | fbq('track', 'AddPaymentInfo'); |
| Add to cart | The addition of items to a shopping cart (ex: click, landing page on Add to Cart button) | fbq('track', 'AddToCart'); |
| Add to wishlist | The addition of items to a wishlist (ex: click, landing page on Add to Wishlist button) | fbq('track', 'AddToWishlist'); |
| Complete registration | The submission of a registration form (ex: complete subscription, sign up for a service) | fbq('track', 'CompleteRegistration'); |
| Contact | A telephone/SMS, email, chat or other type of contact between a customer and your business | fbq('track', 'Contact'); |
| Customize Product | The customization of products through a configuration tool or other application your business owns | fbq('track', 'CustomizeProduct'); |
| Donate | The donation of funds to your organisation or cause | fbq('track', 'Donate'); |
| Find Location | A web or app search for one of your business locations that suggests intention to visit | fbq('track', 'FindLocation'); |
| Initiate checkout | When someone enters the checkout flow (ex: click, landing page on checkout button) | fbq('track', 'InitiateCheckout'); |
| Lead | When someone expresses interest in your offering (ex: form submission, sign up for trial, landing on pricing page) | fbq('track', 'Lead'); |
| Purchase | Purchases or checkout flow completions (ex: Landing on "Thank You" or confirmation page) | fbq('track', 'Purchase', {value: 0.00, currency: 'USD'}); |
| Schedule | The booking of an appointment to visit one of your locations | fbq('track', 'Schedule'); |
| Search | Searches on your website, app or other property (ex: product searches) | fbq('track', 'Search'); |
| Start trial | The start of a free trial of a product or service you offer (ex: trial subscription) | fbq('track', 'StartTrial', {value: '0.00', currency: 'USD', predicted_ltv: '0.00'}); |
| Submit application | A submitted registration form for a product, service or program you offer (ex: credit card, educational program or job) | fbq('track', 'SubmitApplication'); |
| Subscribe | The start of a paid subscription for a product or service you offer | fbq('track', 'Subscribe', {value: '0.00', currency: 'USD', predicted_ltv: '0.00'}); |
| View content | Key page views (ex: product page, landing page, article) | fbq('track', 'ViewContent'); |
Confirm which standard events you'd like to track, and simply add them as a new line to your Facebook Pixel base code. That's about it!
Event Setup Tool
If you want to create new events without updating your base code and/or customize the standard events already added to your base code, use the “Facebook Event Setup Tool”.
- This tool is available via Facebook Pixel > Events > Set Up (as shown below).

- You should then be able to select a method of setting up events, choose the Facebook Event Setup Tool for the purposes of this tutorial.
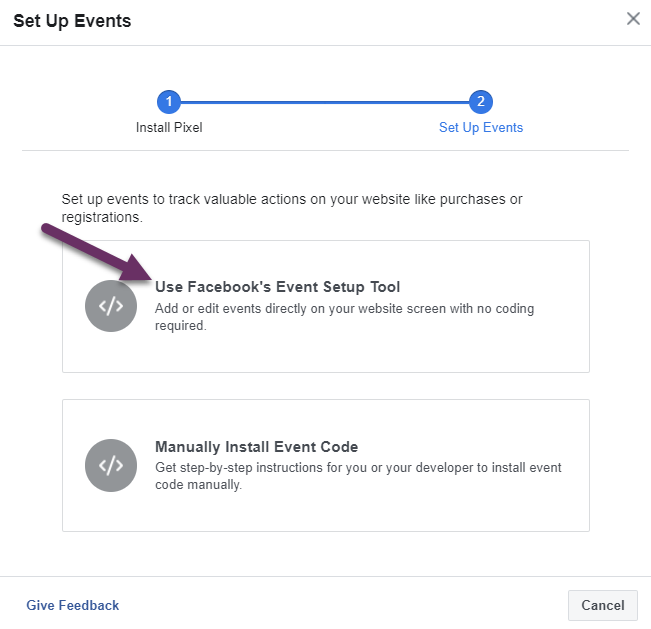
- Add your Pixel’s website URL for creating and testing the new events via the Event Setup Tool like so:
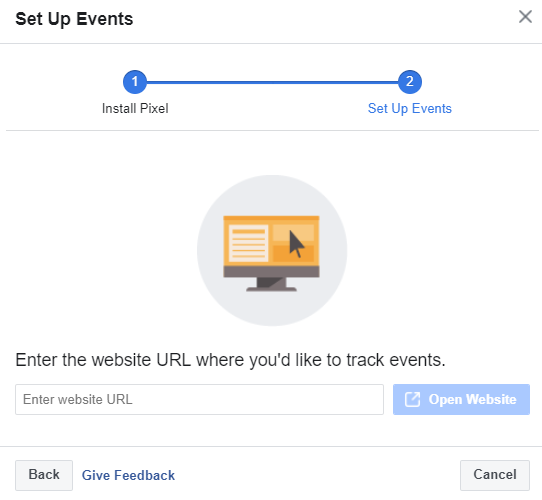
There are several components and features of this tool. When you open your website URL, you’ll see the following. Follow the instructions below for setting up events.

- The Event Setup Tool will allow you to click anywhere that’s highlighted on the page to set up a new event.
- You’ll see that there’s multiple options highlighted, but the blue highlighted image at step 2 indicates I’ve clicked on that button to track.
- Set up an event based on the event options that come through in the dropdown. You can also set up events based on page URL “equals” matches or “contains” matches. This is very useful for defining standard events in order to later track them specifically as conversions.
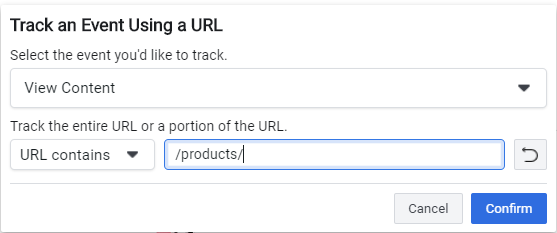
That’s about the gist of the Event Setup Tool. Easy, right? You can find the full manual from Facebook here.
Facebook Pixel Conversions
Now that you have set up standard event tracking and might have even customized certain events using the Event Setup Tool, it’s time to define which ones should be counted in Facebook and Instagram Ads as “Conversions”.
Creating Custom Conversions
While in the Events panel, go to “Create Custom Conversion”.
You can set up conversions manually by setting rules in the Conversion Tool or you can simply select a standard or custom event from the dropdown like so:
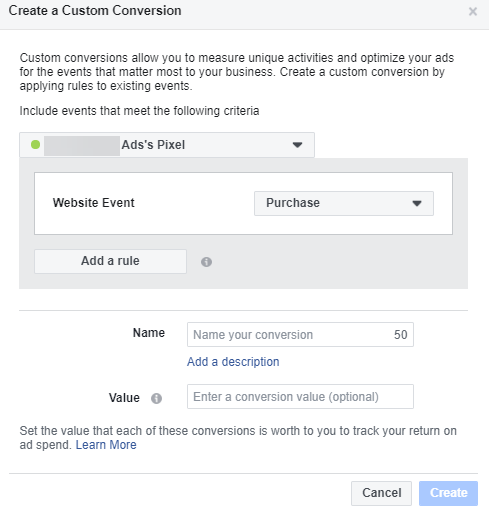
Your conversions will be now counted within the Ads Manager. That’s all you have to do to get crackin’ on launching your paid campaigns!
How to QA Your Facebook Pixel Setup
Real-Time Testing
You can easily test to see which events are firing and which aren’t via the Test Events Debugger in real-time. See below for a screenshot, but check out the testing section later in this post as well:

Troubleshooting Events with the Debugger
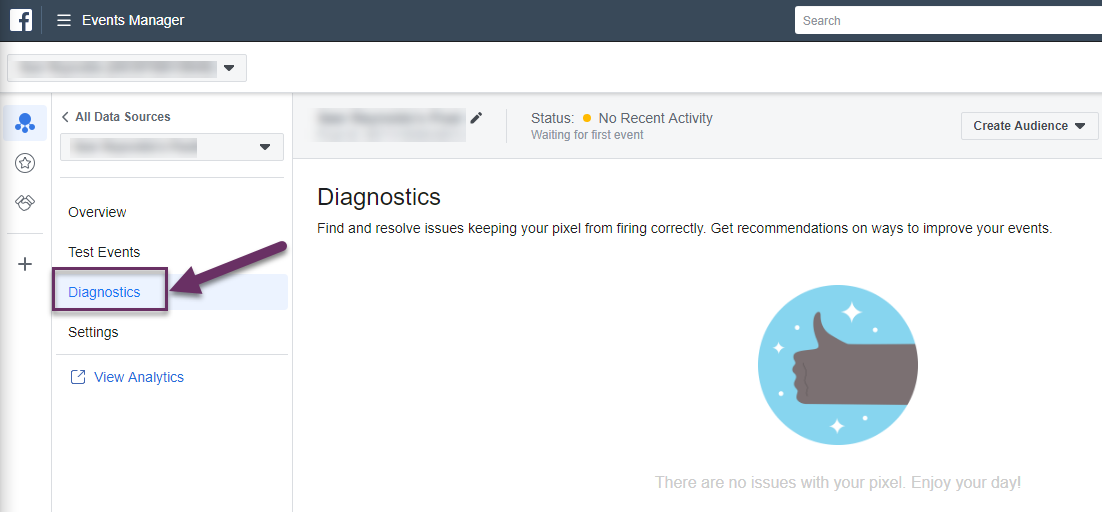
In addition to testing your events in real-time within the Facebook Events Manager, you can easily check the Diagnostics panel, to get the insights surfaced for you and an explanation of the cause (if Facebook has it). You can send it to your developer for troubleshooting if that’s needed as well.
Using the Pixel Helper Chrome Extension
Make sure to test your events and conversions are working properly within Facebook tools. But a nifty tool you can use to get a higher level idea of what’s tracking via this Chrome extension. Download it for checking tracking in your browser.
That wraps things up! You should now be armed with a squeaky clean implementation of the Facebook Pixel. What do you think? Are you bookmarking this guide or do you think you’ve got it down?
Let us know in the comments below and make sure to send any questions our way as you dig into the process.


