Since Google Analytics rolled out the new Acquisition, Behavior, and Conversions reports on October 9, we’ve received many questions about what’s changed, what’s new, and how to use these reports. In this post, we’ll cover:
- An overview of the new default Channel Groupings
- Working with the Channel Groupings
- Google Analytics’ definition of channels
- Default Channel Groupings vs. the All Traffic Report
- How to adjust tagging based on the Channel Groupings
- Recommended custom Channel Groupings
Default Channel Groupings - Overview
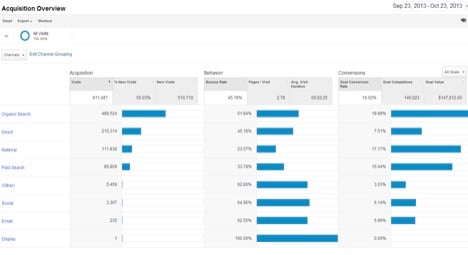
- Direct
- “Generic” Organic Search
- Referral
- “Generic” Paid Search
- Other Advertising
- Social
- Display
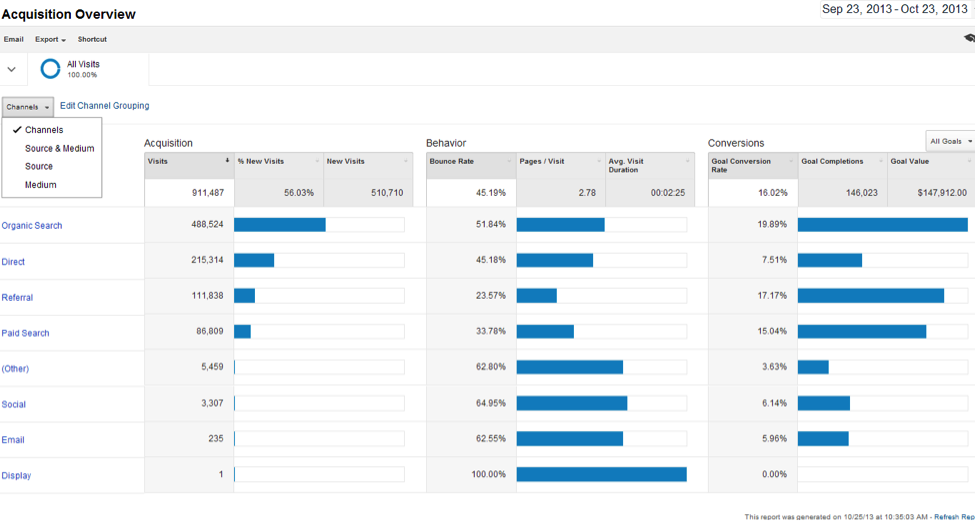
By default, the Acquisition Overview report shows all 8 pre-defined Channels, but you can drill down by Source & Medium, Source, or Medium:
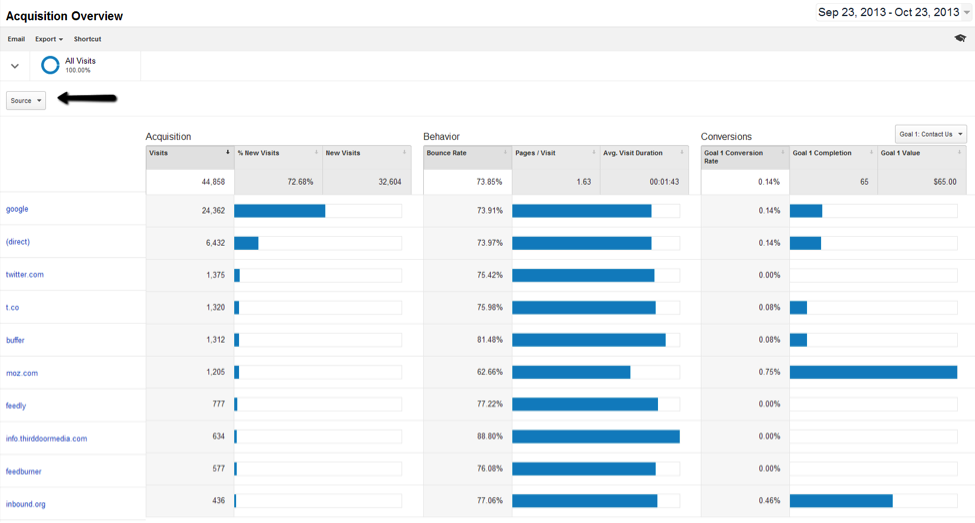
 For example, this is how the Acquisition Overview report will look if you choose to drill down into Source:
 The same data can be viewed in the Channels report, displaying the numerical values for each data point rather than the bar graphs:
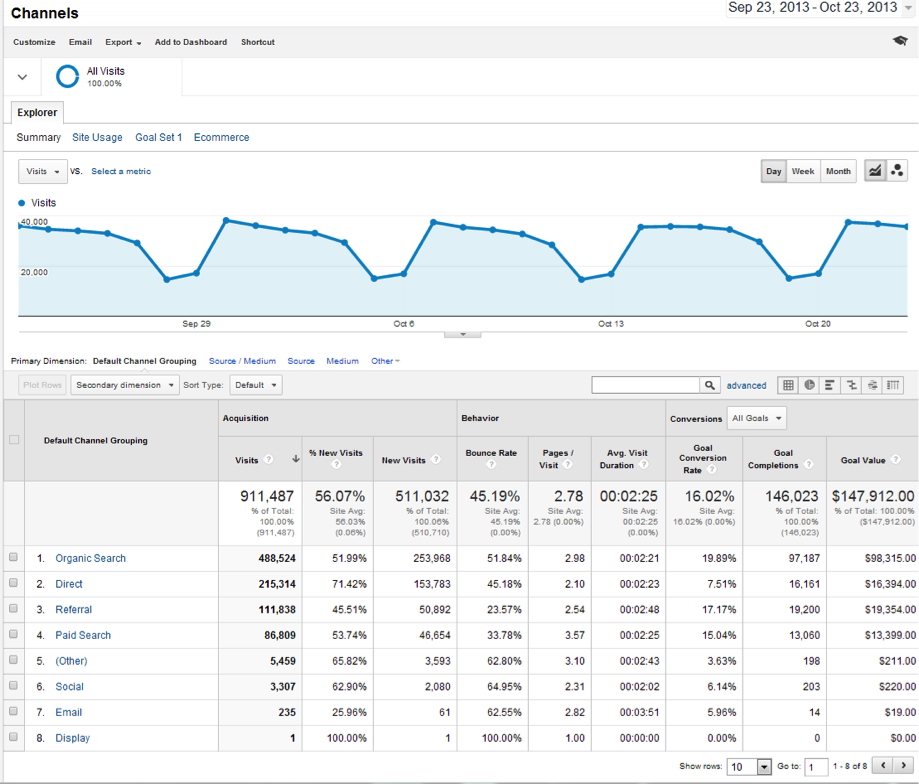
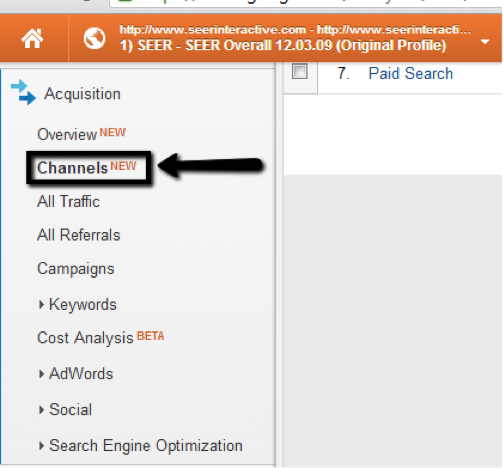
The Channels report can be found underneath the Acquisition report Overview:
Default Channel Groupings vs. the All Traffic Report
Since Google provides system-defined Channel Groupings, you might be inclined to think that the traditional All Traffic report is nearing obsolescence, but this isn’t true, for the following reason:
- As noted earlier, Google predefines the data in the out-of-the-box report, so you’ll need to understand these definitions prior to acting on this data. These definitions and the related regex are listed here and below:
Default Channel Grouping Google’s Definition Direct Source = Direct AND medium = (not set) OR medium = (none) “Generic” Organic Search Medium = organic Referral Medium = referral Email Medium = email “Generic” Paid Search Medium = ^(cpc|ppc|paidsearch)$ AND Ad Distribution Network ≠ Content Other Advertising Medium = ^(cpv|cpa|cpp|content-text)$ Social Social Source Referral = Yes OR Medium = ^(social|social-network|social-media|sm|social network|social media)$ Display Medium = ^(display|cpm|banner)$ OR Ad Distribution Network = Content AND Ad Format ≠ Text
- The problem with Google’s definitions is that your own definitions for each channel might not line up. For example, many people initially assumed all “Generic” Paid Search contained in Other Advertising and Display. If that’s the case, this will undoubtedly lead to inaccurate conclusions being made from using the pre-defined data.
There are three solutions to address these inconsistencies, if you attempt to compare data from the All Traffic report to the Acquisition Overview reports:
- Work within Google’s definitions;
- Completely rewrite & customize Channel Groupings, with all rules reflecting the project and goals, or;
- Use the system defined rules with modifications.
Working within Google’s definitions might not be realistic for those who have sites with an existing tagging methodology in place, so some level of customization would make sense for most people. Another caveat to these reports is that they’re not necessarily accurate, even using Google’s own definitions:
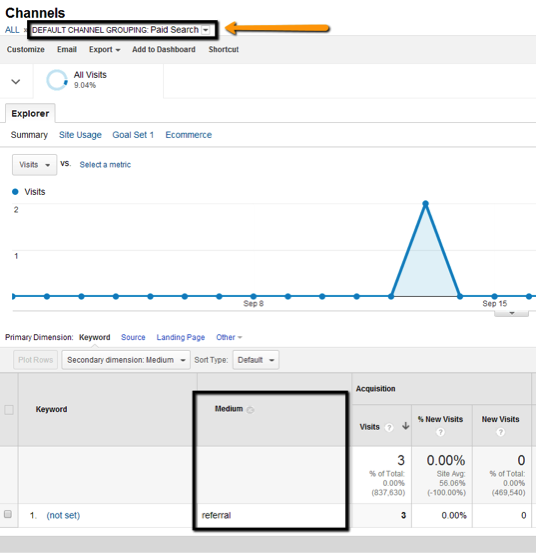
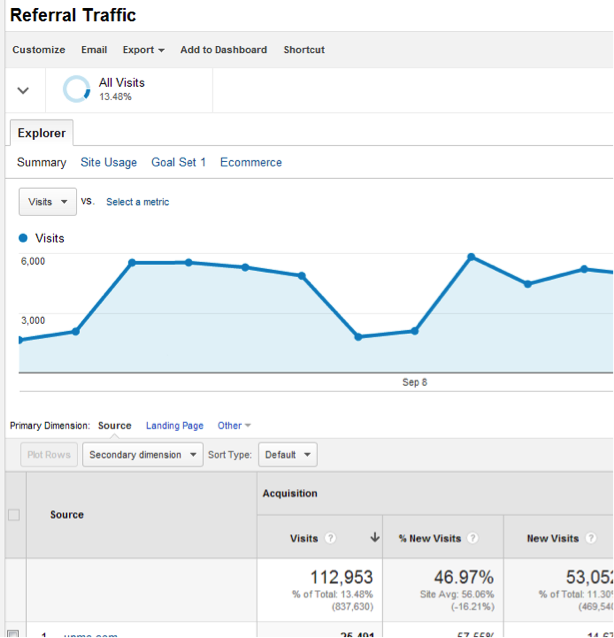
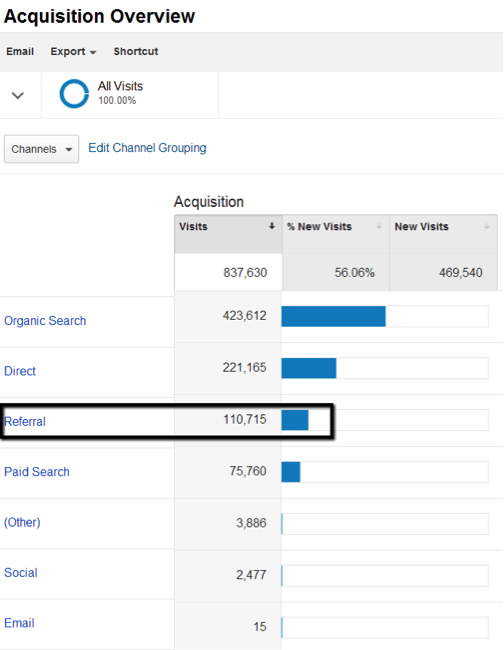
The example above shows Google’s Paid Search Default Channel Grouping, with LinkedIn as the source. Despite Google’s regex for Paid Search, “referral” is shown when the Secondary dimension of Medium is applied. In this next example, the Referral Traffic report showed 112,953 visits. For that same time period, the Acquisition Overview report displayed 110,715 visits:
Finally, keep in mind that data in this view only goes back to July 2013, so any historical reporting will still need to be done from the All Traffic report. Use your regex to pull this data, and create a custom channel to ensure consistency between the reports.
Working with the Channel Groupings
The biggest advantage to the Acquisition Overview report is the ability to create and customize Channel Groupings that make the most sense for your client’s site. As previously noted, Google supplies 8 system-defined Channel Groupings that can only be modified by adding additional rules to the system defined portion. However, new custom channels can be defined, defaults deleted, and all reordered to best suit your needs.
To edit Channel Groupings, use the following steps:
Step 1
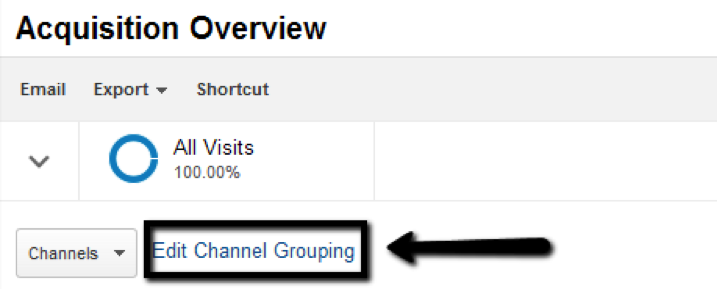
- Navigate to the Acquisition Overview report, and click “Edit Channel Grouping”
Step 2
- Select the Channel Grouping name or click Actions > Edit to modify

Step 3
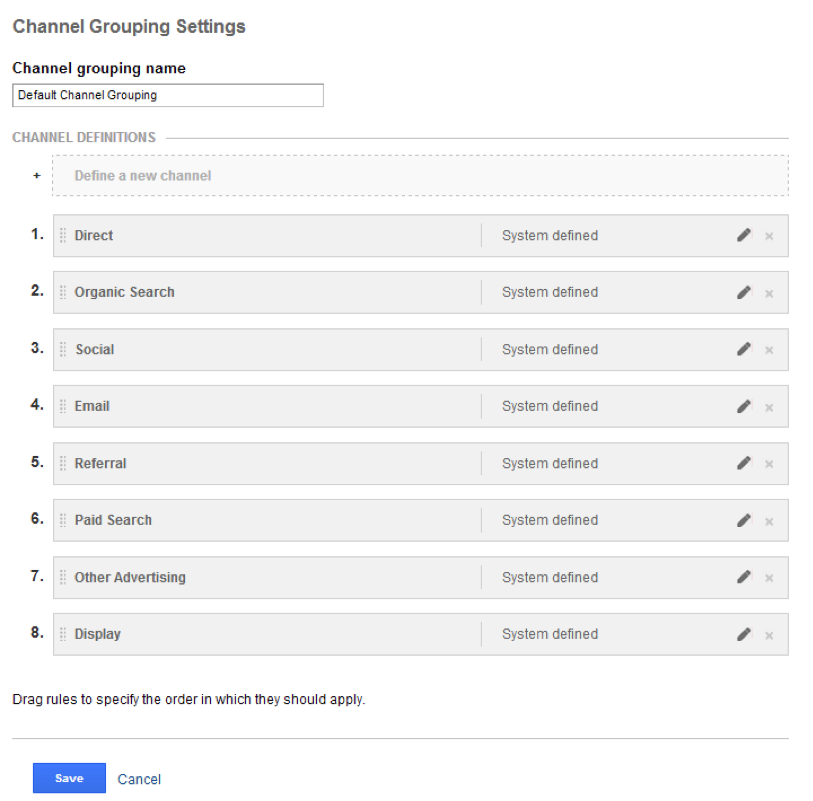
- Within this screen, you can change the Channel Grouping name, define a new channel, create rules to define each channel, or edit an existing channel
To define a new channel:
Step 1
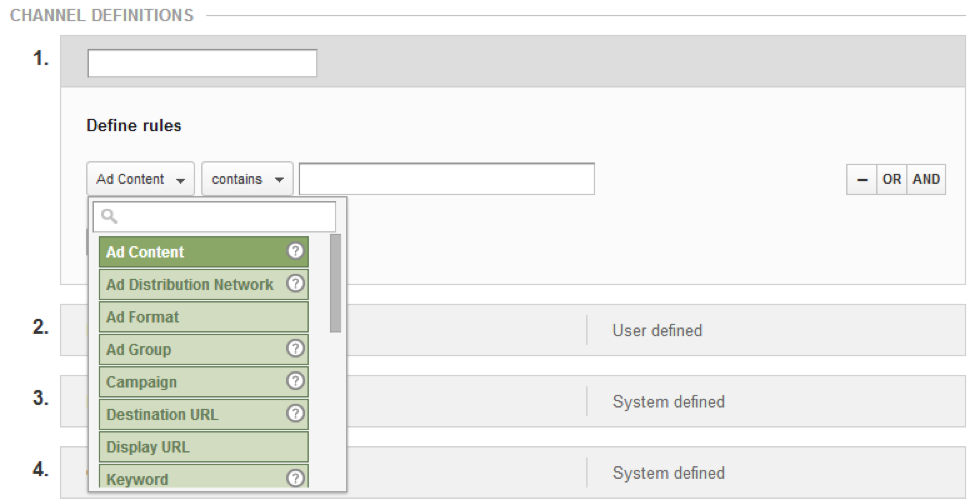
- Click “Define a new channel”

Step 2
- Create your rules as you would define a filter
Step 3
- Order your channels as they should be applied, so that more specified channels are above catch-alls. For example, a custom channel for specific referral traffic would be placed above the default referral traffic.
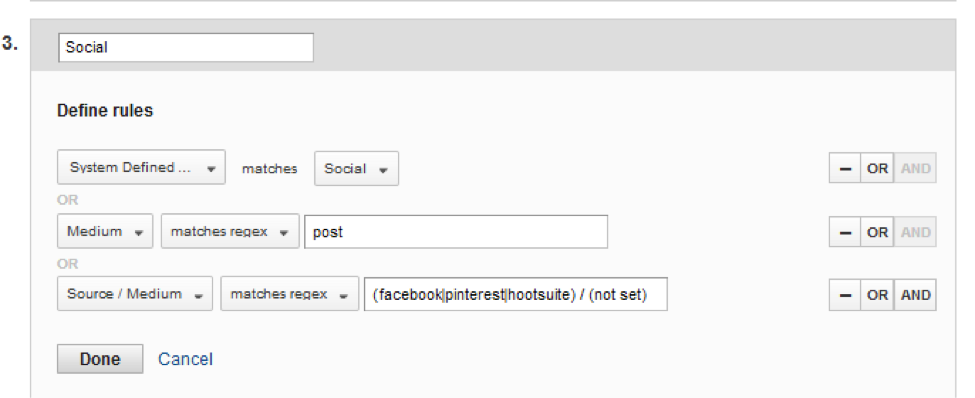
To modify an existing channel, simply click edit, keep the System Defined rule, and add OR rules to capture anything the system isn’t already capturing:
IMPORTANT: Your new rules will not be available right away - it could take up to 24 hours for changes to be reflected in your reports:

- This applies to newly created channels and edits on existing channels.
Changes and additions are not retroactive, and any data reported on will be reflected starting on the day the channel goes live. This functionality is similar to how implementation of profile filters works.
Tagging Your Marketing Campaigns
Consistent campaign tagging will be even more critical with the default groupings. If you’re manually tagging URLs within marketing campaigns, this new reporting format both emphasizes consistency to match your rules and gives the flexibility to combine things that may not always match. Consistency is especially important if you choose to work within Google’s definitions, since you’ll have to name your tags to match how Google pulls that data. The following mediums would match the default channels, be sure to stick with all lowercase for consistency:
Email: utm_medium=email “Generic” Paid Search: utm_medium=cpc Social: utm_medium=social Display (paid banners, display ads, etc.): utm_medium=banner Other Paid Advertising: utm_medium=cpa
If you’re not currently tagging URLs in your marketing campaigns, you may want to consider doing so. It will help you manage your efforts, and protect against any unannounced changes that Google makes to their definitions. If your tagging doesn’t match Google’s standards, that’s ok, you’ll just want to customize your channels.
Custom Channel Groupings
The 8 default groupings may be exactly what you need, but it’s more likely your company has different needs. A few reasons to make adjustments:
- You have custom campaign parameters in place that doesn’t match all the system-defined channels.
- You have affiliates, or owned websites that might be better separated out of “referral” traffic.
- You have a large amount of visits in “Other Advertising” that could be broken out.
- You want to provide more granularity in your channel reporting.
You want to separate channels from a specific medium in additional ways such as source or campaign.
Ideas for Custom Channels
Here are several channels you might consider; though it’s highly unlikely you’ll need all of them. (Remember you’re trying to make your life easier by grouping by channels that make sense for your situation.) Note almost all of these need to be adjusted based on your own custom campaign parameters. If you don’t have any URLs tagged with a medium of “video” or “pre-roll” for example, the Paid Video channel won’t work. (Also, don’t forget that order matters!) Jump to a Custom Channel Type:
- Paid Video
- Paid Social
- Affiliate Referrals
- Owned Websites Referrals
- RSS
- Offline or Vanity URL
- Social Facebook
- Social Twitter
- Social Pinterest
- Google Organic
- Bing Organic
Paid Video
If you manually tag your video ads you could use this regex to capture by medium. Or you can distinguish paid video ads that might autotag using campaign names.
Medium matches regex: video|pre-?roll
Paid Social
If you’re tagging your paid, promoted posts/tweets separately from your regular social posts, you’ll likely want to separate them from social.
Medium matches: promoted post|paid (social|post)
Affiliate Referrals
Setup of this could vary greatly depending on how you’re currently tracking affiliates. Assuming your affiliate parameter isn’t excluded in your GA setup, here’s one way to set it up if your parameter is afid.
Medium exactly matches: referral AND Source matches regex: afid
Owned Websites Referrals
If you have domains without cross-domain or cross-subdomain tracking (and want them to stay that way) you may want to break out the type of referrers. For example, if we want to distinguish traffic coming from rcs.seerinteractive.com to our main site:
Medium exactly matches: referral AND Source matches regex: rcs.seerinteractive.com
RSS
Depending on how you tag your RSS feed, distinguish those visitors:
Medium matches regex: rss|feed OR Source matches regex: feedly|feedburner
Offline or Vanity URL
If you have vanity URLs used to track various offline marketing. You might try something like this:
Medium matches regex: ^(offline|vanity ?(url)?)$
Social Facebook
If you have more Facebook traffic than all your other channels, you might not want it rolled up into the default social channel. Add this channel ABOVE the default social channel.
Source matches regex: ^facebook.com|^m.facebook.com AND Medium matches regex: referral|social
Social Twitter
If you have more Twitter traffic than all your other channels, you might not want it rolled up into the default social channel. Add this channel ABOVE the default social channel. You could also add Hootsuite, though Hootsuite supports other social channels.
Source matches regex: ^t.co$|twitter|tweetdeck AND Medium matches regex: referral|social
Social Pinterest
If you have more Pinterest traffic than all your other channels, you might not want it rolled up into the default social channel. Add this channel ABOVE the default social channel.
Source matches regex: pinterest AND Medium matches regex: referral|social
Google Organic
Want to distinguish Google organic from your other organic traffic? Add this channel ABOVE the default Organic Search channel (and rename the Organic Search channel all other Organic.)
Source exactly matches: google AND Medium exactly matches: organic
Bing Organic
Want to distinguish Bing organic from your other organic traffic? Add this channel ABOVE the default Organic Search channel (and rename the Organic Search channel all other Organic.)
Source exactly matches: bing AND Medium exactly matches: organic
Experiment!
This isn’t all you can do by far. Channels give us a powerful tool to both separate and group our channels by sources, mediums, campaigns, and other dimensions in a variety of ways without always needing to change tagging. And in different ways for each View! (Views were previously called “profiles”, see our best practices for profile setup.) So while your Overall view may have organic as a single channel. Your Organic Profile you might create a few separate organic channels for the engines you’re focused on. Just remember to try them out in a Test view first (again, see best practices.)
Leave us a comment and let us know which channels you’re creating with this new feature.


